7-Step Troubleshooting Forms

Use the same troubleshooting forms we use in our hands-on Electrical Training Courses in your facility!
Click images for full-sized view.
Detailed Guidance on the 7-Step Troubleshooting Methodology Covered in Orion Technical Solutions Courses
1 - Symptom Recognition: This should include senses, operator input, and gathering any other information that may aid in troubleshooting (recent maintenance, trouble & maintenance logs, appearance, recent ops, etc.). This should also include developing an accurate understanding of how the applicable system or system functions SHOULD work when working properly. Too often technicians neglect this important step of the troubleshooting process and are simply looking for obvious ‘easter eggs’ under rock, instead of understanding the system or function adequately. This step often requires some RTFM by the technician (read the functional manual) and some study. It is also very important to accurately and thoroughly define the problem in as much detail as reasonable. Simply stating that ‘ machine won’t start’ is inadequate – symptom recognition should include details of actions taken, problems noted, modes, conditions, observations, consistency of problem, history/trend of problem, related issues noted, etc..
2 - Symptom Elaboration: This step is largely front panel, HMI, trends & graphs type information. In this step you should note any observations that provide clues as to the big picture causes of the failure (which system or function is misbehaving). Perform appropriate tests, operations, etc. Record detailed findings. Understand system (including reviewing references if needed).
3 - Determine the Faulty Systems: The idea here is to start big picture and move in. This is key to troubleshooting more logically. Instead of rushing in and guessing that it’s a fuse or loose wire or some other easter egg under a rock, analyze the problem starting with big picture to help identify which systems or functions could (and could not) be causing the problem. This will help eliminate a huge amount of work on more complex problems and prevents people from going in repetitive circles. Think logically about which system (or function on smaller systems) could be causing the observed problem and list them. Then perform testing as needed to isolate the faulty system or function. Once you determine which system is misbehaving, you can think of the layers as their own entity and troubleshoot strategically by zooming in to sub-system, device, or component level as applicable. If there are 4 major systems and it is incredibly difficult to prove a certain one bad, try just proving the others are NOT the problem. Many times, the option of proving something bad by proving all other parts as good is neglected in troubleshooting even when it could save massive amounts of time or prevent needing to do a very burdensome step in troubleshooting (such as a compartment entry, extensive permit requirements, plant shutdowns, etc.). Thinking about what you can test easily is part of smart troubleshooting.
4 - Determine the Faulty Sub-System (or Component): Make a list of each major sub-system that could potentially cause the noted observations or problems and then perform necessary testing and analysis in order to prove (or disprove) faulty systems (or functions). This is the same process as Step 3 – it is just zoomed in to the next layer of the problem. In some complex systems, you may need to repeat steps 3 and 4 multiple times to go from system to sub-system, to function to sub-function, to device, to sub-device, to component (and so on). The key is to think in block diagram format and each time you determine which block is bad, you zoom into that block to analyze it in detail. This is the “divide and conquer” approach and is helpful in any complex problem.
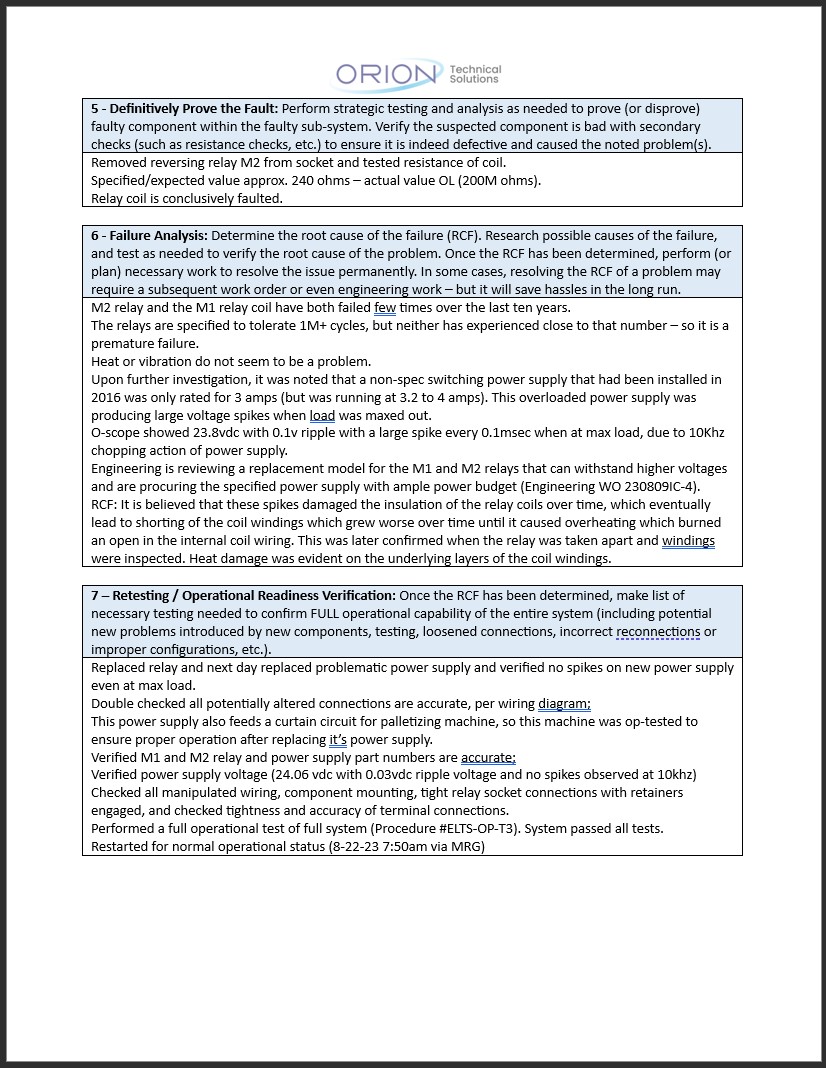
5 - Definitively Prove the Fault: Perform logical testing and analysis as needed to prove (or disprove) faulty component within the faulty sub-system. This is simply a continuation of steps 3 and 4 zoomed in to the device or component level. Typically, at this step the technician PROVES (confirms) that the suspected component is bad using secondary checks (such as resistance checks, diode checks, continuity tests, etc.) to ensure it is indeed defective and created the noted symptom(s).
6 - Failure Analysis: Determine the root cause of the failure (commonly termed the RCF). Research possible causes of the failure you discovered, and test as needed to verify the root cause of the problem. Once the RCF has been defined plan or perform the work necessary to resolve it once and for all. Steadily applying this approach over time will have a tremendous positive impact on a plant or facility and is possibly the number one organizational flaw within many instrument/electrical shops that ironically leads to technicians being so busy fixing repeating problems that they “don’t have time to do the RCF properly”…
7 – Retesting / Operational Readiness Verification: Once the problem AND the RCF has been determined and repaired, make list of necessary testing needed to confirm FULL operational capability of the entire system. Don’t just check to see if the main symptom went way! Think about things that could have changed due to the troubleshooting, testing, replacements, reconfigurations, etc., including any potential new problems introduced by new components, loosened connections, incorrect reconnections or improper reconfigurations, etc.).. A large number of safety incidents, fatalities, and injuries are caused by inadequate retest after a corrective maintenance task, not to mention it may help identify a fault before it causes downtime or other more substantial headaches.
Tips on Electrical Troubleshooting Form:
This form is useful in ensuring a logical approach to troubleshooting. This form is a sample, similar to what we use in some of our training courses to help engrain a systematic and logical approach to troubleshooting - but this form and approach can be modified and applied to a wide variety of equipment and industries.
General Notes:
- The complexity of plants and systems may vary by industry or even by problem. For example, if troubleshooting a palletizing machine that won’t restart, the number of ‘layers’ may not be as intensive as troubleshooting a problem with excess particulate discharge of a large complex water treatment facility. In many cases, you will need to repeat steps 3 and 4 repeatedly starting at biggest picture (zoomed out) and working your way down to smaller subsystems or sub-functions until you get to the damaged component (or module/device) level.
- This format presented in this form is general in nature and may not apply accurately to every situation. The primary purpose of this form is to develop and encourage a ‘logical’ and ‘systematic’ approach to troubleshooting. If the form helps improve the logical flow of troubleshooting and/or at least helps improve documentation and accuracy of troubleshooting steps performed, it will have been worth using.
- This guidance covers the logical aspects of troubleshooting only. It is assumed that anyone performing troubleshooting on electrical, instrumentation, automation, or other systems will be following all applicable safety precautions, and any other regulatory requirements. For sake of clarity and ease of conceptualization, these aspects are not covered in this form or the guidance below.

Electrical Troubleshooting Form Available - Contact Us
Contact Mike Glass at (208) 715-1590 or email him at mike@orion-technical.com if you'd like an editable Microsoft Word (.docx) version of this form to modify and use in your facility.

About the author
Mike Glass
Mike Glass is an ISA Certified Automation Professional (CAP) and a Master Certified Control System Technician (CCST III). Mike has 40 years of experience in the I&C industry performing a mix of startups, field service and troubleshooting, controls integration and programming, tuning & optimization services, and general I&C consulting, as well as providing technical training and a variety of skills-related solutions to customers across North America.
Mike can be reached directly via [email protected] or by phone at (208) 715-1590.