Electrical troubleshooting sample question #3
Troubleshooting Problem:
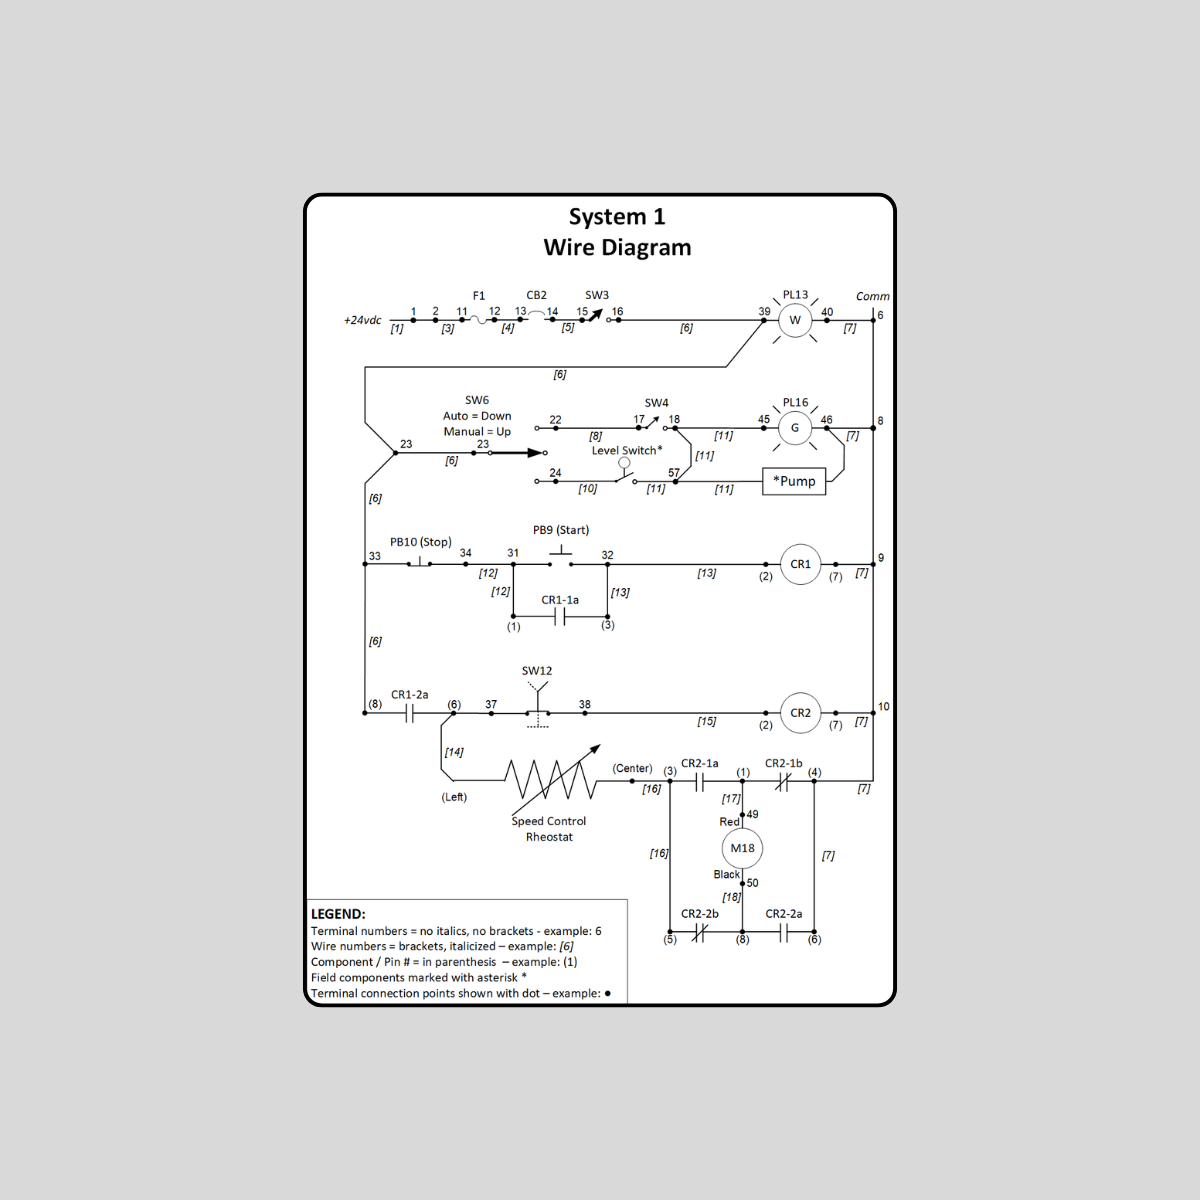
Use the wiring diagram shown to the questions below:
PL13, PL16, and the Pump work normally. And relay CR1 seems to energize and latch normally (per the included LED and the mechanical flag both show proper operation);
But M18 does not move in either direction regardless of the speed control rheostat setting AND CR2 does not energize regardless of SW12 position and CR1 status.
Identify 3 (or more) things that 'might' be the cause of this problem.
*For extra challenge - list all the steps you could take with contingencies before reviewing the following:
********************************************************************************
Solutions / Explanation:
On this sample exercise, we use the Orion 7-Step Troubleshooting Form to document the troubleshooting process. This is in order to show a typical example of what might be good to record as a technician as well as covering root cause analysis and retest procedures (and suggestions for prevention of reoccurrence).
The key to this fault is using good symptom analysis to identify the possible faulty sections. Based on symptoms the troubleshooter should conclude:
Everything works up to and including CR1 coil. But nothing below TB33 / TB 9 works.
If the problem was somewhere between pin 6 of CR1 and TB10 (either on the CR2 branch OR on the Rheostat & M18 branch) then the other branch would at least partially function properly. So - the only things that are common to each symptom observed are:
• Feeder path between TB33 and pin 8 of CR1 relay - shown in yellow
• CR1 contacts between pin 6 and 8 of CR1 (CR1-2a contacts on diagram) - Shown in green
• Common return path between TB10 and TB9 - shown in purple

From there, we move to step 4 of the 7-step troubleshooting procedure and begin testing in order to isolate / identify which section is the problem using simple voltage checks and then confirm the exact location via resistance checks. The exact sequence can vary and may include hunches, experience, as well as visual clues, etc.


The 7-step troubleshooting method (and our sample form above) is extremely helpful when troubleshooting. The biggest problem troubleshooters make is to start checking voltages or fiddling with wires or swapping parts before they even understand the system or the applicable schematics or drawings. By being methodical, one can quickly and accurately find the problem with no 'wrong guesses' or blindly swapped parts.
During our Basic Electrical Troubleshooting courses, we emphasize the logic and approach used - because once the logic is solid and use of meters is strong, we find that personnel are able to apply these concepts to troubleshoot any system - even quite complex systems. It is all about dividing and conquering.
Yes - If you would like to download blank 7-step troubleshooting forms for your personal use (or for your team), you can find them here.
These are just hypothetical scenarios designed to make people think and get them to apply good troubleshooting habits and practices. The purpose of the blog is not to imply there is only one path to solution - but rather to help stimulate the logical approach to troubleshooting.
The biggest weakness I see in troubleshooting is that people rush in and don't think about how to logically isolate and prove where the problem is. So, I emphasize that heavily in the training.
And the shameless plugs are below - to convince you that you want to take this course or our other similar courses. ;)
>>>>>>>>>>>>>>>>>>>>>>>>>>>>>>>>>>>>>>>>>>>>>>>>>>>>>>
To encourage the focus on logic, I have students informally keep score of each troubleshooting scenario where each voltage/resistance check counts as a shot, and they shoot for low score like in golf. I even give them an approximate par shot value for each fault to help push them to focus more on logic than speed. Swapping parts without sound reasoning is discouraged unless the logic says it makes sense, and they have confirmed the part is defective in some way (where possible).
By the time students have troubleshot 6-10 problems of increasing complexity they typically have some new (good) habits and better approaches in troubleshooting, and I hear from customers that these improved logical approaches extend well beyond purely electrical problems.
Fun Fact - I helped one of my customers develop a system to test practical troubleshooting skills of incoming electricians using a training simulator much like the one I still use for these sample problems with several levels of electrical faults. It made a huge difference in the screening as well as helping identify gaps and upskilling their existing workforce. It was interesting to observe folks who claimed to be seasoned experts struggle to identify basic faults. Many times it became quite obvious that the candidates didn't really understand basic electrical concepts at all.
Side note - I often suggest to my customers to make use of some of the online simulations for troubleshooting as well, to help maintain skills - but I recommend learning with real hands-on equipment initially to help connect the concepts to what they'll be doing in the field. Once the theory to field associations are solid in their minds, online and PC based troubleshooting simulations are a fantastic aid in skills retention.
If you are thinking, man that sounds like a fun class - you are right! Our new ELTS course is one of the most enjoyable classes I've personally taught in my 40 years because I see a ton of progress in the students and also because solving these types of problems 'what we do' as techies. Students always rave about how much they enjoyed it and how much they learned, and managers tell me it creates a noticeable impact on uptime and MTTR and a reduction in improperly swapped parts and mistakes.
Reach out today if you'd like us to deliver a custom version of this course at your facility or see our upcoming schedule to register for a public offering of our 3-day Basic Electricity & Electrical Troubleshooting course.
Sample electrical troubleshooting questions and answers
Electrical Troubleshooting Questions
Contact Mike Glass at (208) 715-1590 or email him at mike@orion-technical.com if you'd like more sample questions and other ideas to help in assessing the skills of yourself or your team.

About the author
Mike Glass
Mike Glass is an ISA Certified Automation Professional (CAP) and a Master Certified Control System Technician (CCST III). Mike has 38 years of experience in the I&C industry performing a mix of startups, field service and troubleshooting, controls integration and programming, tuning & optimization services, and general I&C consulting, as well as providing technical training and a variety of skills-related solutions to customers across North America.
Mike can be reached directly via [email protected] or by phone at (208) 715-1590.